
一、准备工作
1.AD Windows Server 2008 R2服务器:创建域帐号和组
硬件需求:
内存:2G以上
硬盘:20G以上
CPU:1.4GHz(X64架构)
2.NPS:通过NPS做访问策略
3.DHCP:验证通过后分配ip地址
4.网络设备Cisco 3560
二、开始安装
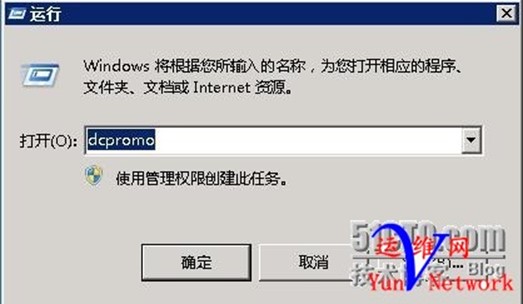
首先安装AD 2008 R2,IP地址设置为静态
执行命令dcpromo
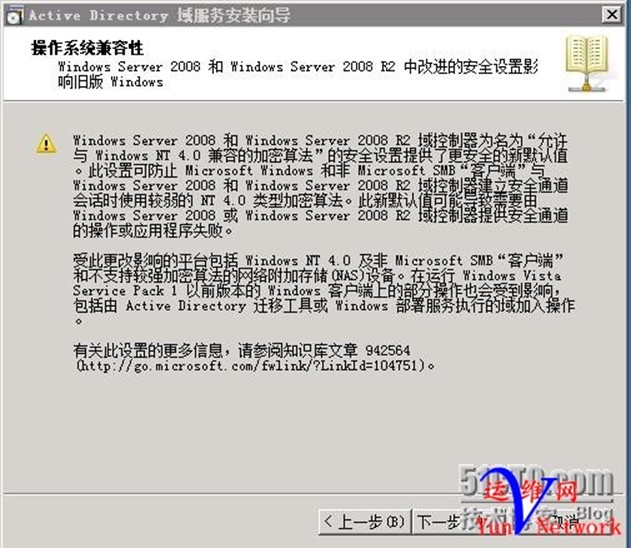
点击下一步
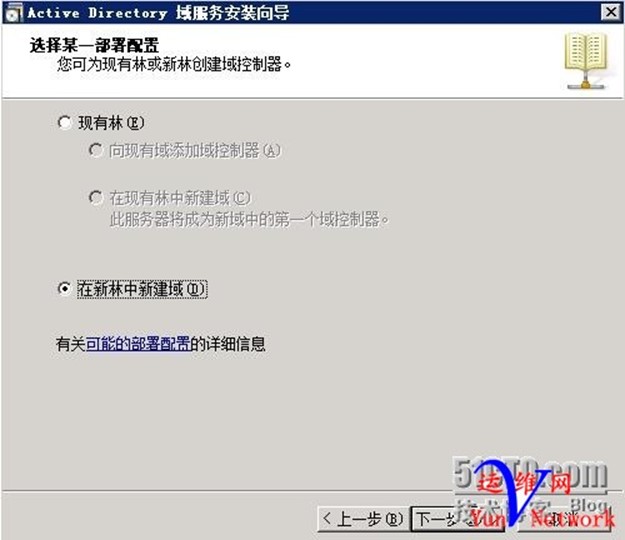
点击 在新林中新建域 ,下一步
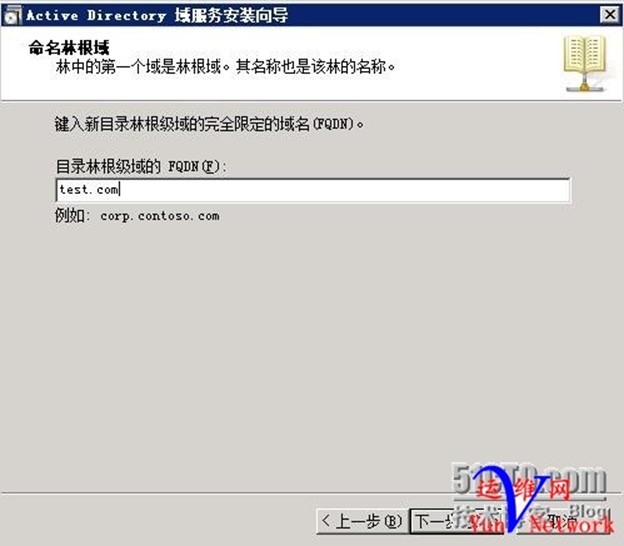
输入要创建的域名,下一步
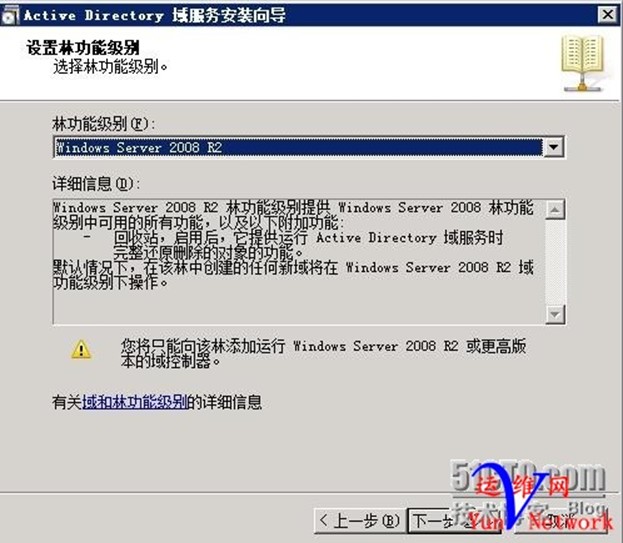
林功能级别选择Windows Server 2008R2,下一步
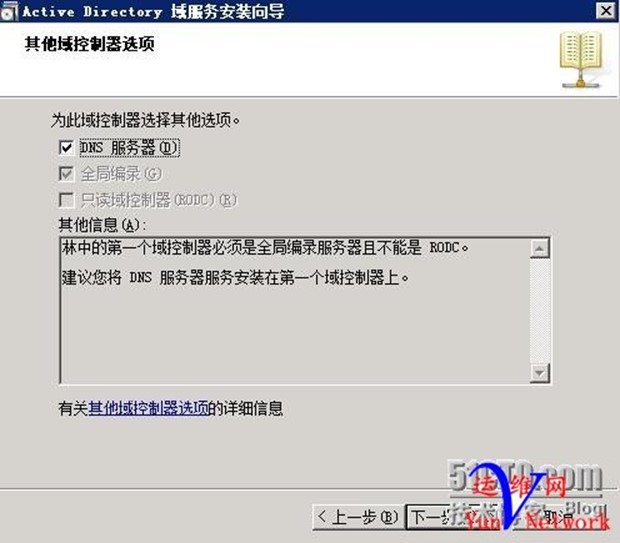
勾选DNS,下一步
下一步……直到安装完成,重启服务器
AD 2008 R2创建成功
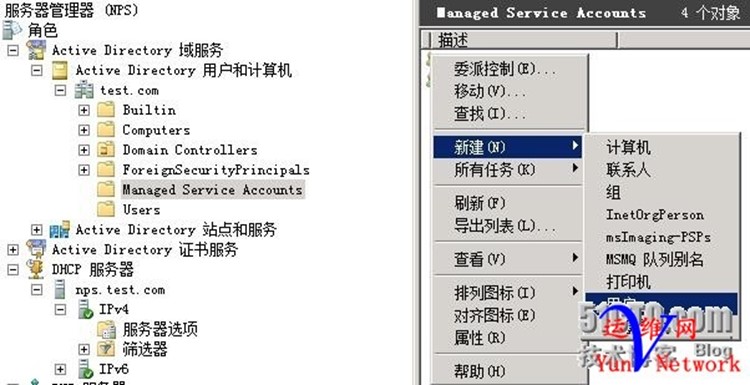
三、创建域账户和组,设置属性
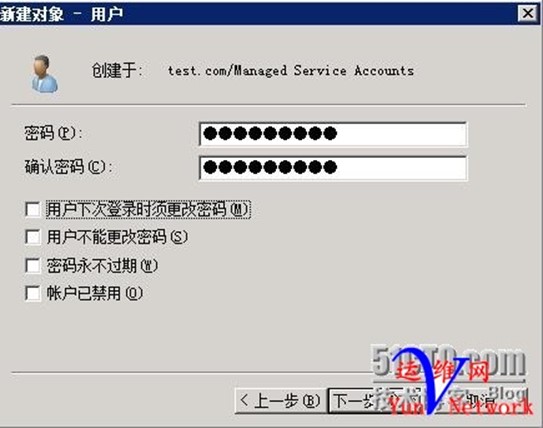
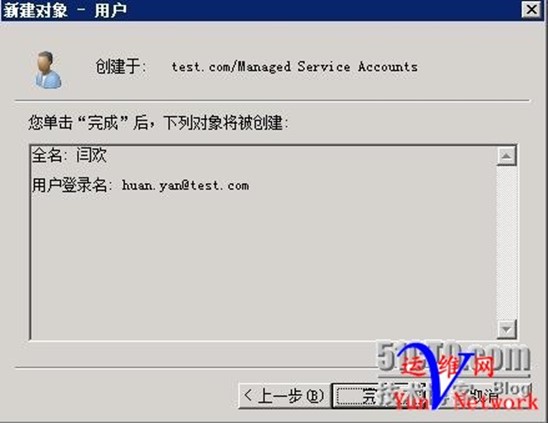
1、创建用户huan.yan密码abcd.1234
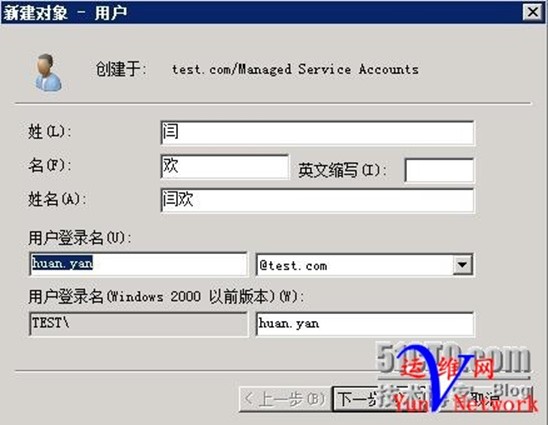
下一步,用户huan.yan 创建完成
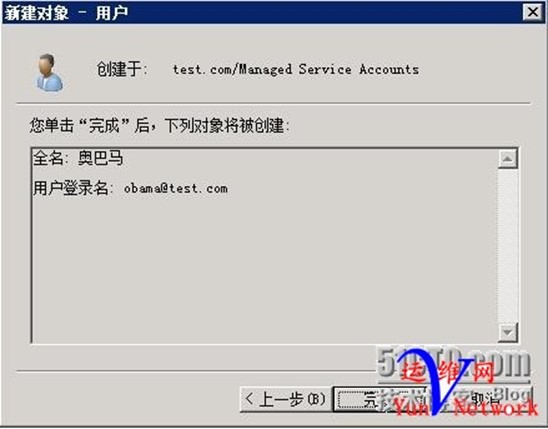
2、创建用户obama密码abcd.1234
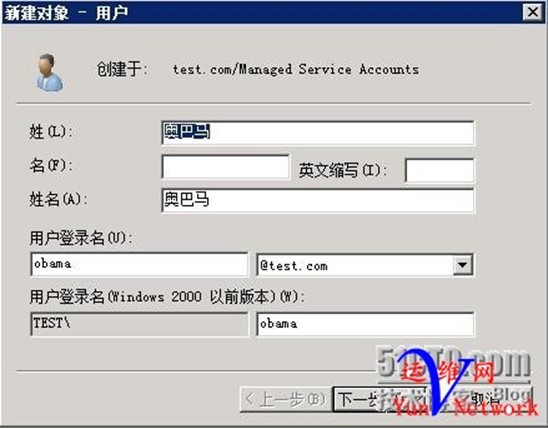
下一步,用户obama 创建完成
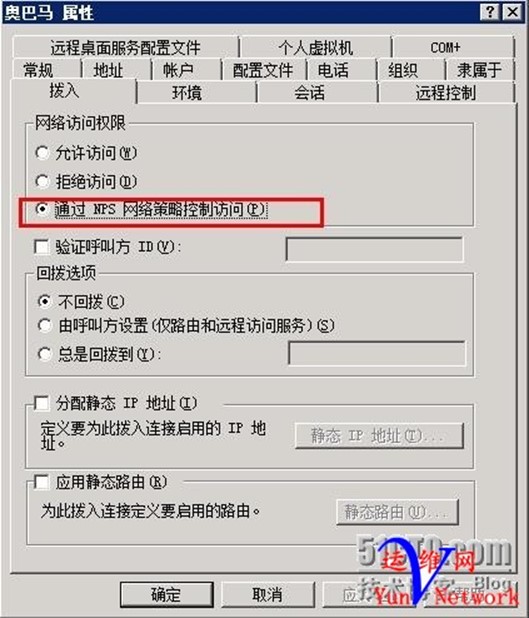
设置用户拨入属性通过NPS网络策略控制访问

完成
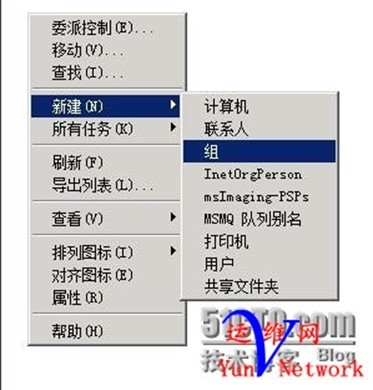
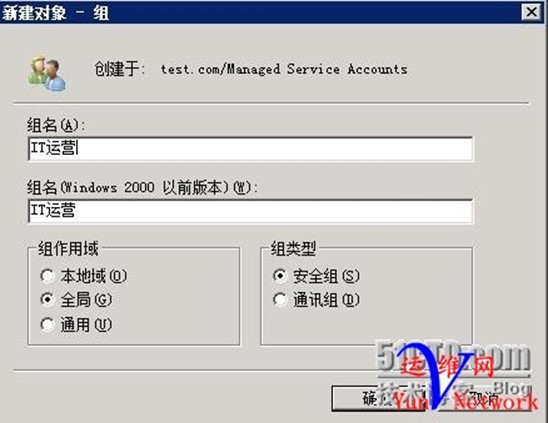
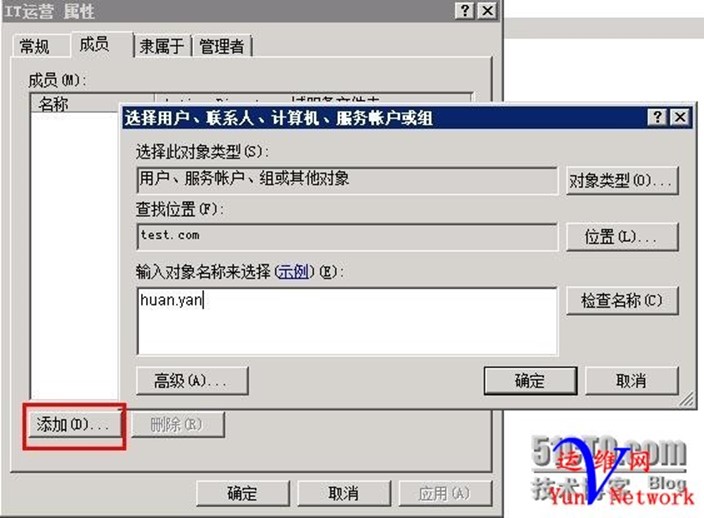
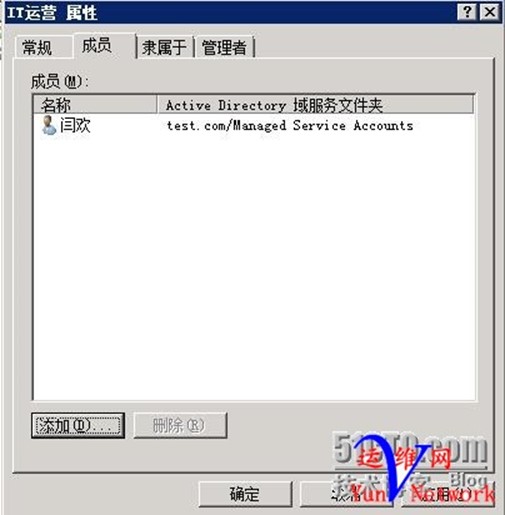
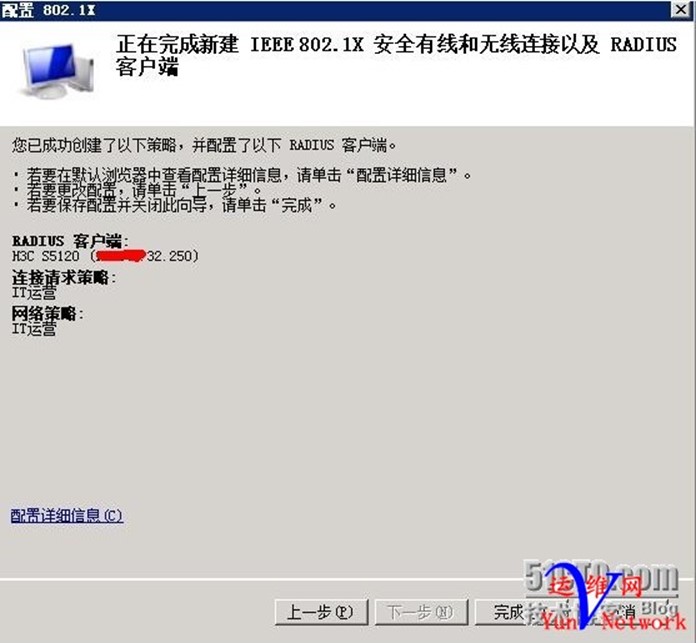
3、创建组:IT运营,将用户huan.yan加入到该组
将huan.yan加入IT运营组
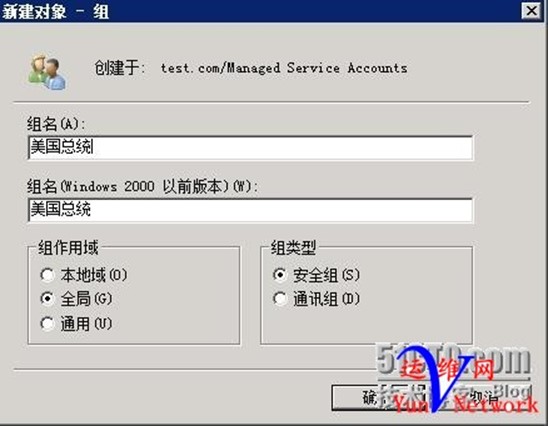
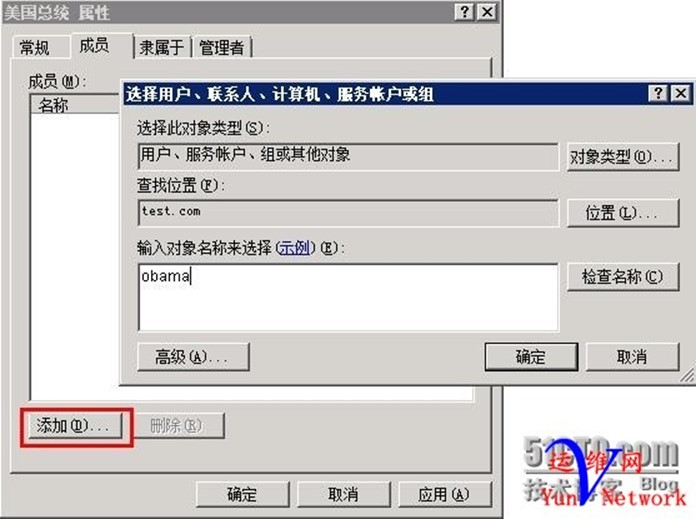
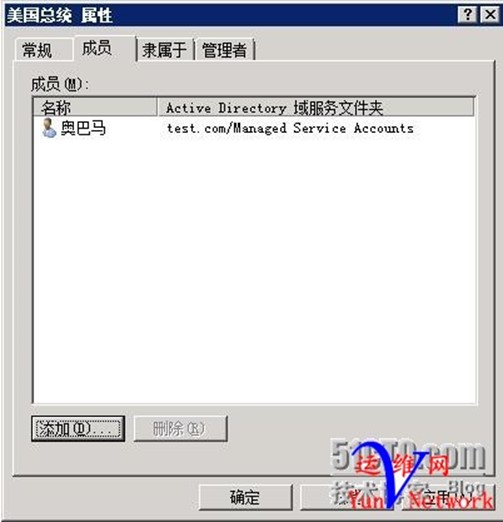
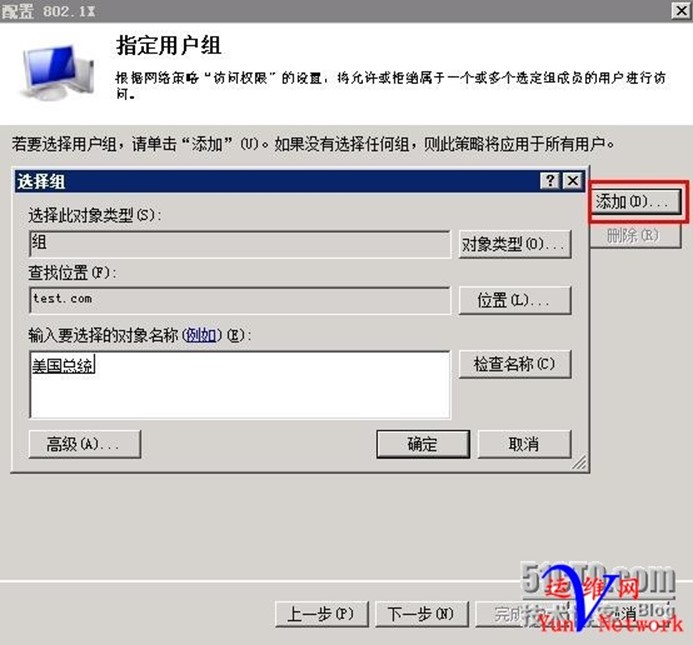
4、创建组:美国总统,将用户obama加入到该组
将用户obama加入美国总统组
域用户和组设置完成
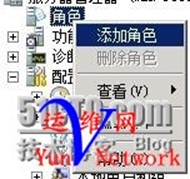
四、添加角色网络策略和访问服务并设置
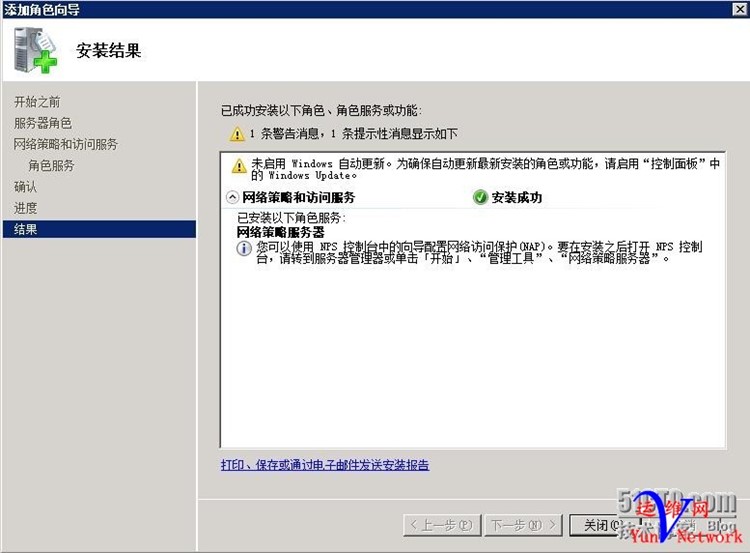
1、安装角色
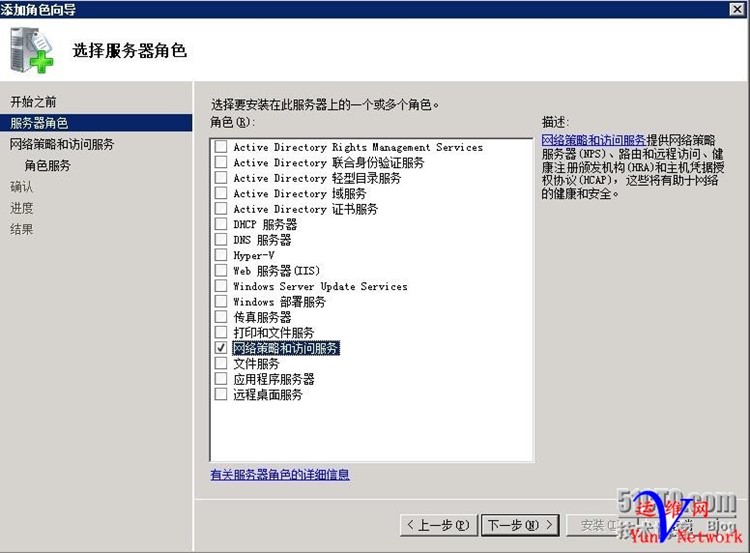
下一步,下一步,勾选网络策略服务器
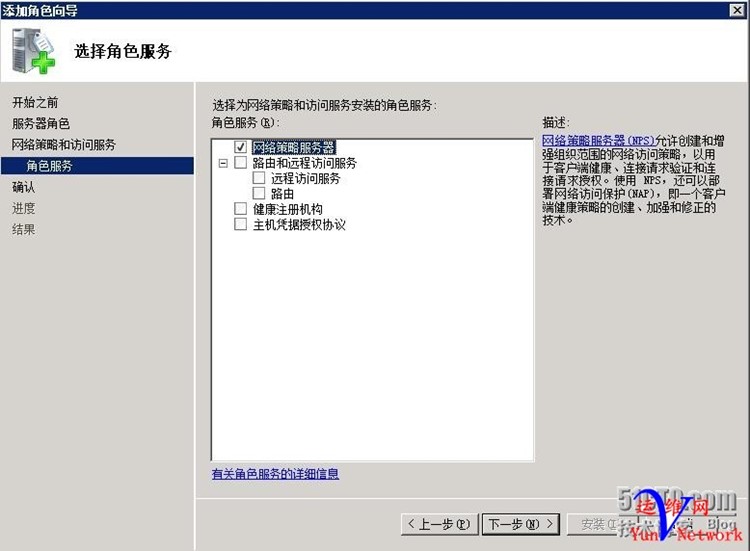
下一步,安装
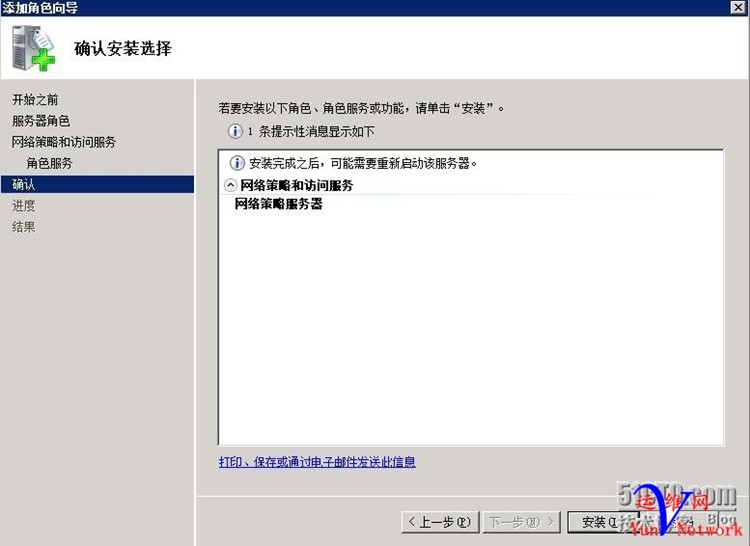
安装成功,关闭
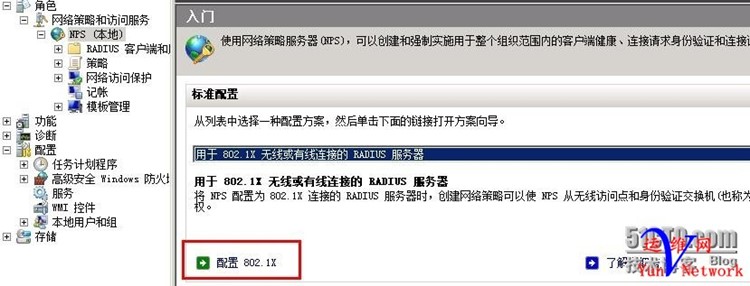
2、配置NPS策略,选择用户802.1xRADIUS服务器,配置802.1x
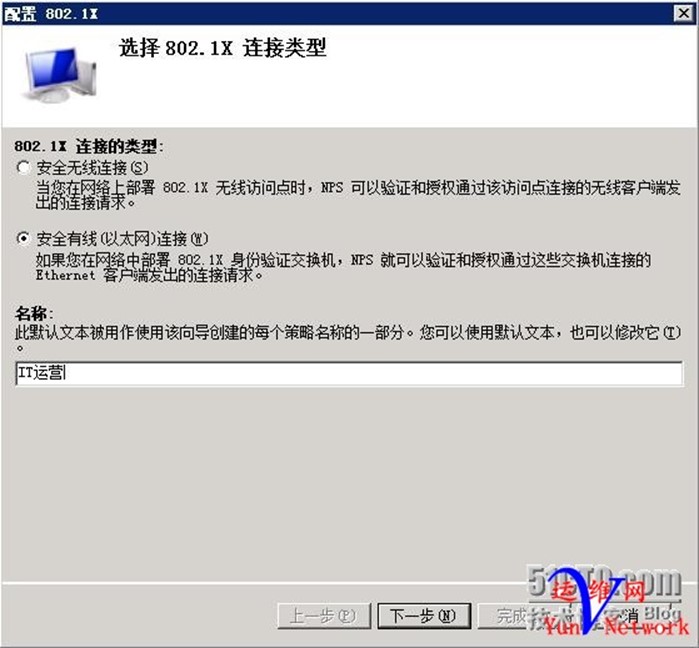
(1)、选择安全有线连接,名称:IT运营,下一步
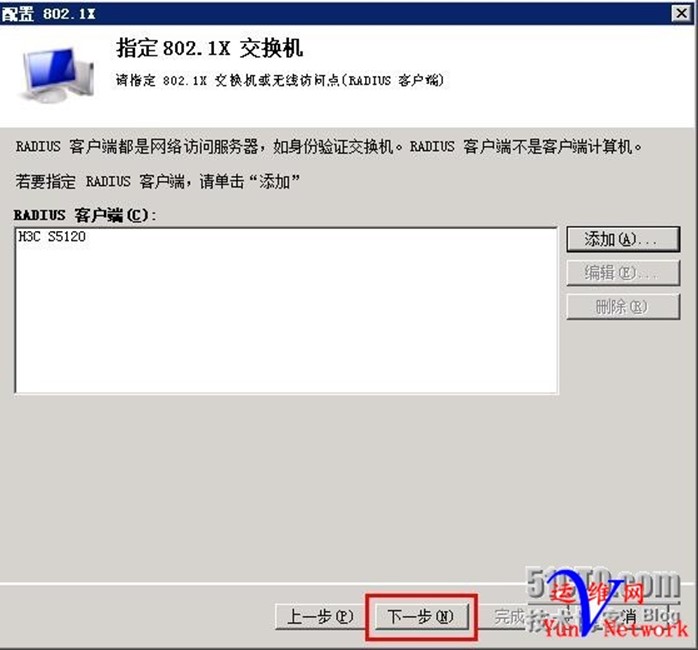
RADIUS客户端,点击添加
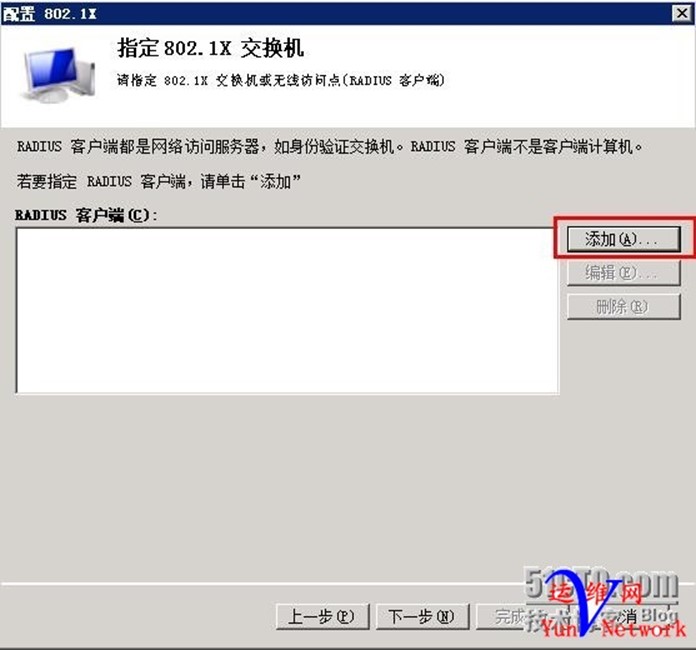
添加需要验证交换机IP地址,共享机密为test.com,确定,下一步

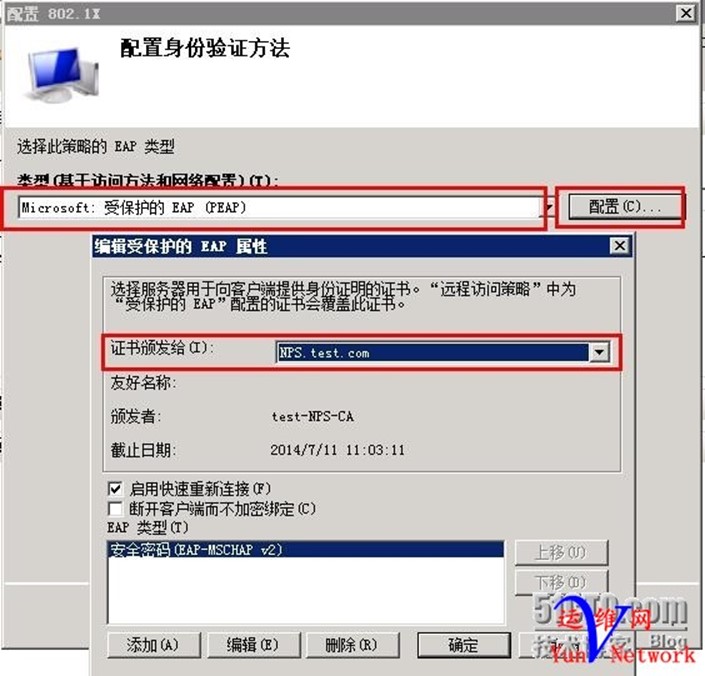
配置身份 选择EAP(PEAP),点击配置 ,证书颁发给 本地主机,EAP类型使用默认,确定
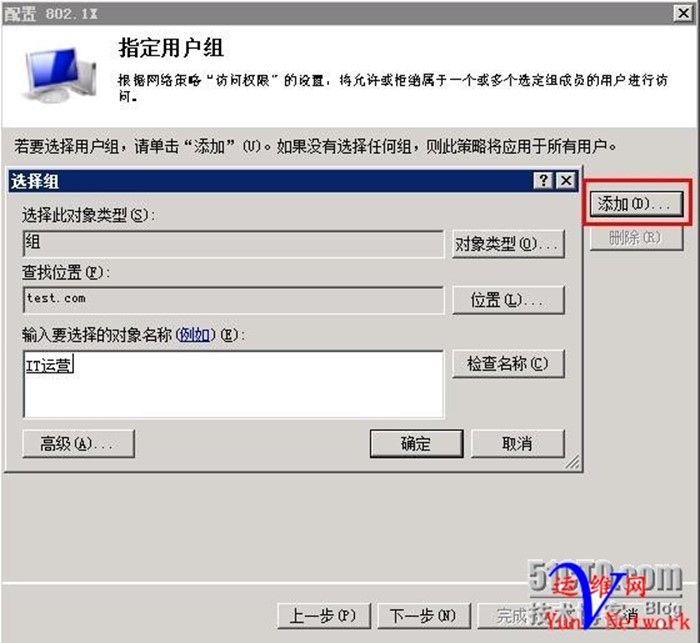
添加用户组IT运营,确定
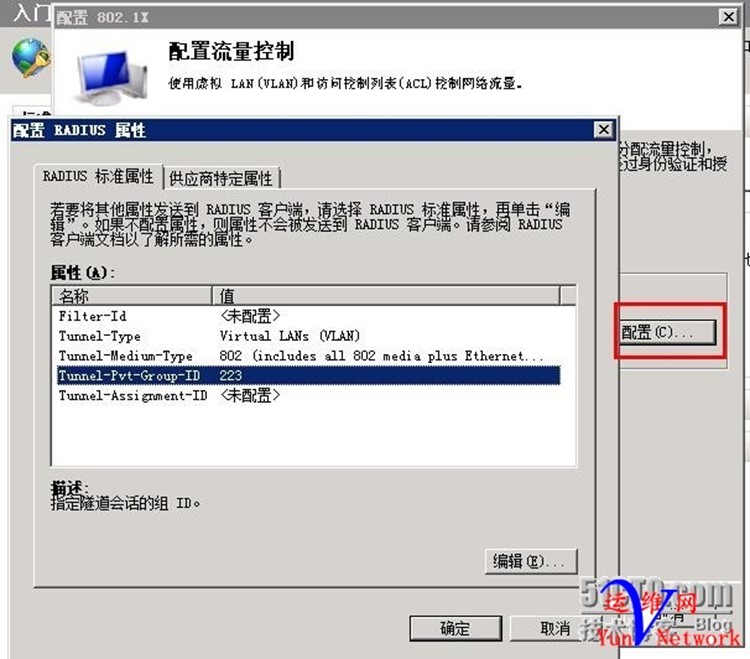
配置流量控制,点击 配置

按照以下参数设置,其中Group-ID为下发的VLAN ID 222
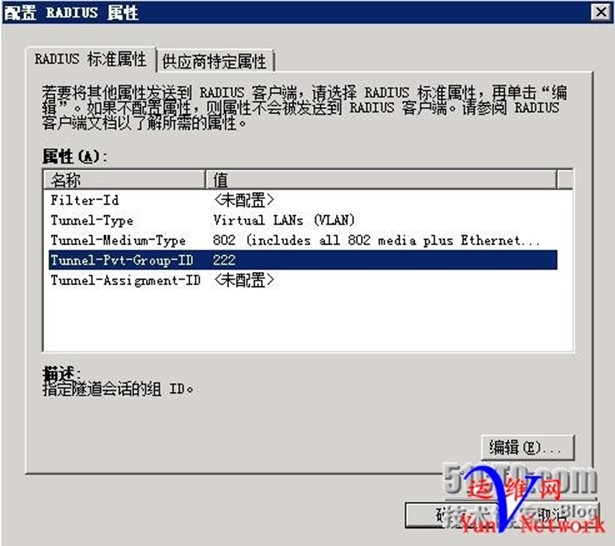
确定,下一步,完成
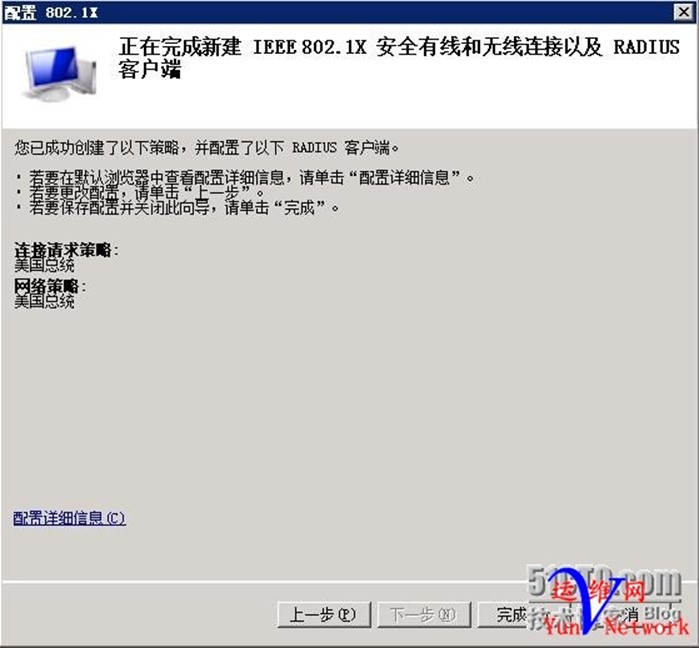
(2)、按照如上方法,创建策略,名称:美国总统,下一步……, 需要验证交换机IP地址,共享机密test.com

将美国总统组添加,下一步
配置流量控制,如下,Group-ID 为VLAN 223
配置完成
五、基于MAC地址的802.1x认证(MAC Bypass)
一般网络环境中我们会使用有线/无线802.1x验证。这种验证方式通常需要结合域账号进行客户端身份验证。验证通过后,根据NPS/IAS策略可以将客户端划分到指定的VLAN并实现记账等功能。
了解无线网络的 802.1X 身份验证 http://technet.microsoft.com/zh-cn/library/cc759077
实际应用中我们经常会碰到一些无法加域的设备,比如打印机,PDA,非Windows计算机等。如何把这些设备放到802.1x的环境中? 一般可以考虑通过MAC Bypass的方式。这种方式中,客户端可以用自己的MAC地址作为用户名和密码进行802.1x验证。
实现步骤如下:
1. 为相关设备创建账号:为了不影响AD中的账号和其他NPS policy,我们在NPS服务器本地创建MAC Bypass所需账号,将这些账号放到一个本地组MAC Bypass里。
NOTE: 帐户的密码设定要遵从接入设备的要求,比如Cisco就要求用户名和密码都是MAC地址。
例如:
Username: 001122334455
Password: 001122334455
2. 在NPS服务器上设置一些注册表项。根据以下文章的要求,我们需要配置注册表项”User Identity Attribute”;这是让NPS服务器支持MAC Bypass;
http://technet.microsoft.com/en-us/library/dd197535(v=ws.10).aspx
注册表路径:
HKLM\SYSTEM\CurrentControlSet\Services\RemoteAccess\Policy
注册表项:User Identity Attribute
注册表值: 31 (dword:0000001f)
3. 在NPS服务器上创建MAC bypass所需的Network Policies:
Policy Name:Mac Bypass
Conditions: User group 中添加步骤1中创建的本地组MAC Bypass。
Constrains: Authentication
Methods 仅需选中 Unencrypted authentication (PAP, SPAP)
Settings: 如果需要将通过MAC Bypass方式接入的客户端放到特定VLAN中,可以配置下图中的3个属性。根据下图,客户端会被划入VLAN 4.
-Tunnel-Medium-Type:802
-Tunnel-Pvt-Group-ID: 你希望使用的VLAN ID, 本例中为4
-Tunnel-Type: Virtual LANs (VLAN)
注:如需更换VLAN ID,仅需更改Tunnel-Pvt-Group-ID对应的数值。
至此Network Policies的部分已经完成。但是测试时我们会发现一个问题,NPS服务器会自动在用户名(MAC address)前加上Domain 名称。(例如MAC 地址为001122334455的用户账户会被自动识别为 domain\001122334455进行验证)由于我们刚才添加的用户是NPS服务器的本地用户而非域用户,最终导致验证失败。
4. 为了解决这个问题,我们需要特别配置Connection Request Policies;目的是当检测到用户名为MAC地址时,自动加上NPS服务器的计算机名(而非域名)。这样NPS会使用本地用户数据库进行验证。
– 首先我们可以复制或创建一条和默认Connection Request Policies相同的policy。
– 在新policy的属性中,在Settings tab下设置Attribute:User-Name;
Find: (^[0-9a-fA-F]{12}$) 注:这个正则表达式是匹配MAC地址的格式。大致意思是从用户账号的第一位开始匹配,检查每一位是否属于0-9, a-f, A-F的范围。成功匹配12次则认为是MAC地址的格式(MAC地址为12位所以需要匹配12次)。
Replace with: RadiusServerName\$1 注:这里需要将RadiusServerName替换成NPS服务器的计算机名

对于正则表达式的使用,微软的文章如下:http://technet.microsoft.com/en-us/library/cc737419(WS.10).aspx.
5. 为了避免步骤4的Connection Request (MAC Address Bypass) 和默认Connection Request Policies冲突,我们可以给默认Connection Request Policies加上一些特殊Condition条件:
我的做法是添加User Name条件,限定user name中必须包含domain名。如果有多个domain名,可以用”|”符号隔开。

这样就真正实现了用户名为MAC地址格式的请求使用NPS本地账号验证。用户名包含domain的请求使用AD账号验证。
以上是NPS服务器支持MAC Bypass的设置。实际上MAC Bypass还需要交换机/AP的支持。有些设备上这个功能叫mac bypass或者mac filtering. 这是因为这种认证发生在客户端无法提供用户名密码的情况下,接入设备通常不会再继续向后台的radius要求验证(因为没有用户名密码)。但是在启用了这个功能的情况下,接入设备如果支持mac authorization,则会继续用mac address作为验证的凭据。
比如 Cisco 的设备就支持这个功能
六、安装DHCP服务器,并配置
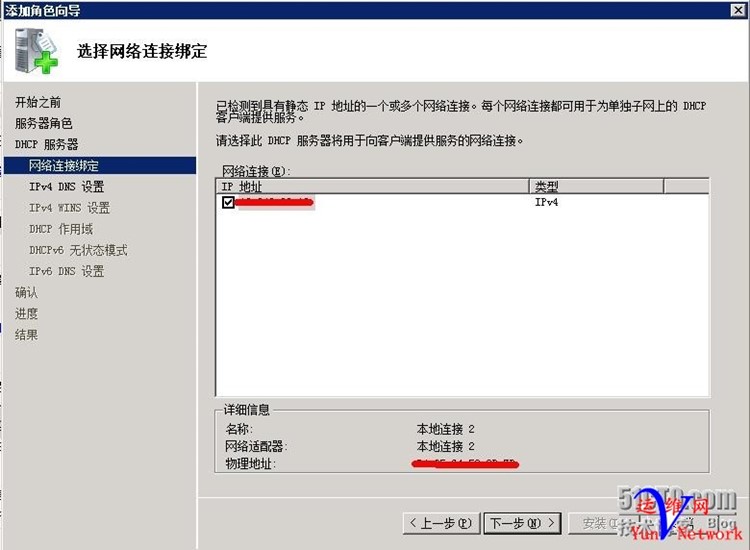
1、安装角色DHCP
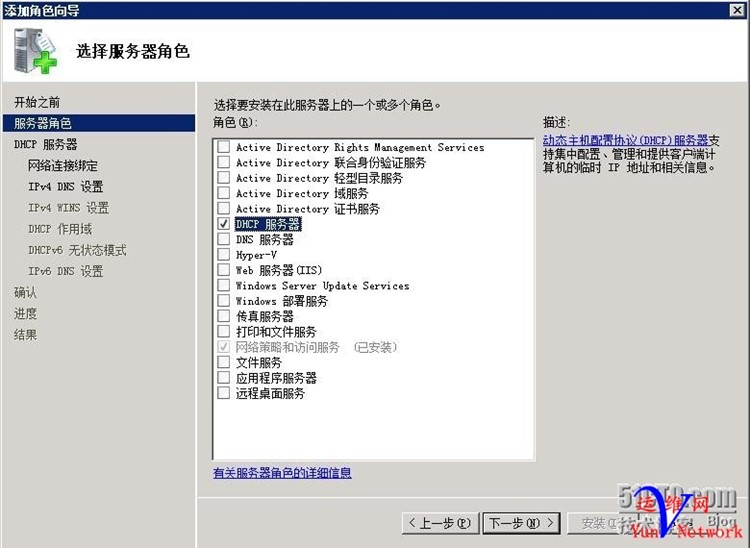
下一步,下一步
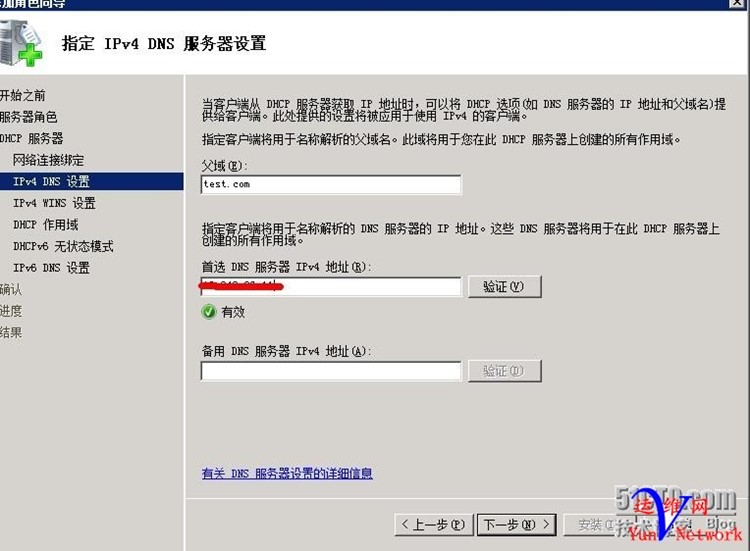
父域添加上面创建的test.com,DNS服务器填本机
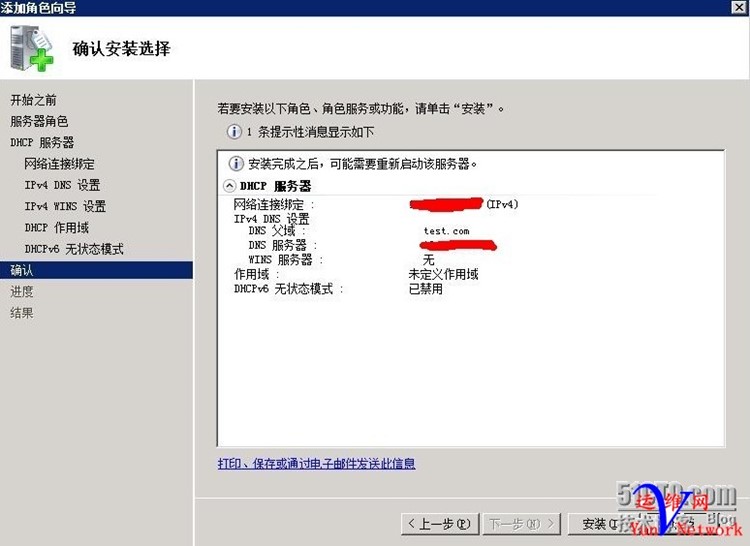
下一步,下一步,完成
2、配置DHCP服务器
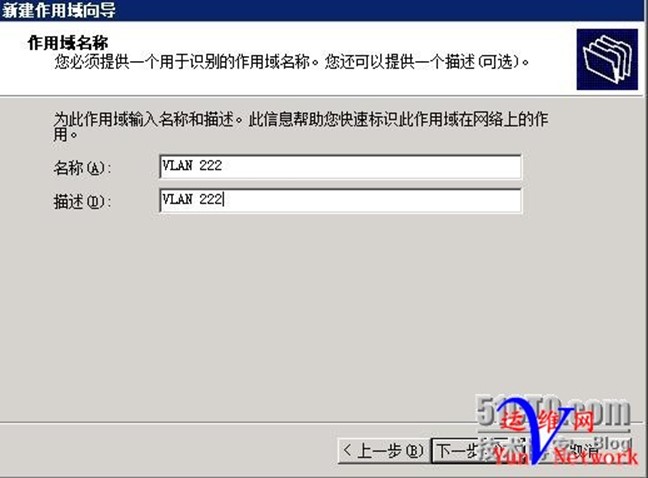
(1)、新建作用域
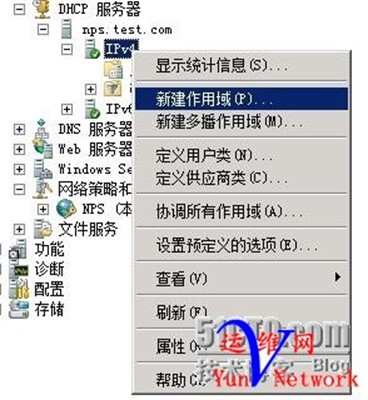
此作用域供给VLAN222(IT运营)使用,下一步
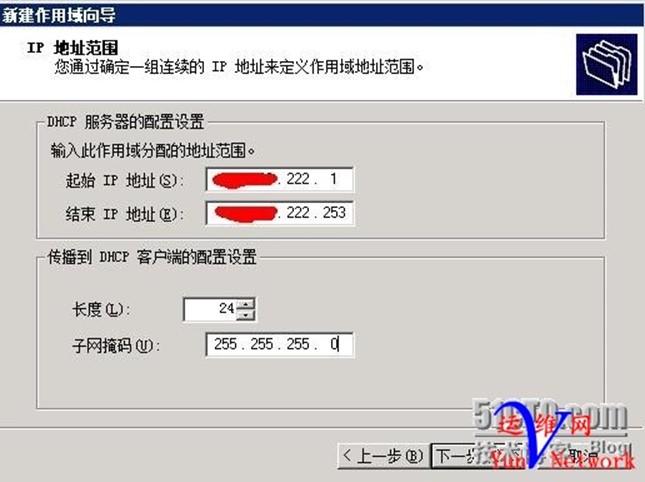
起始地址和为172.16.222.1,结束地址172.16.222.253,掩码24位
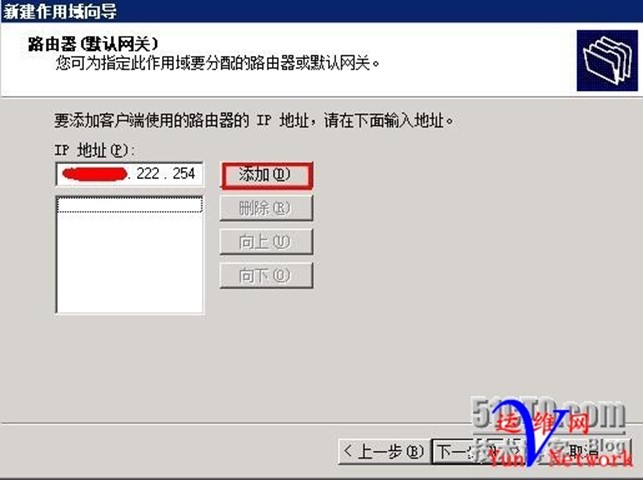
下一步,下一步,配置网关,为172.16.222.254,
配置DNS地址为本机,下一步
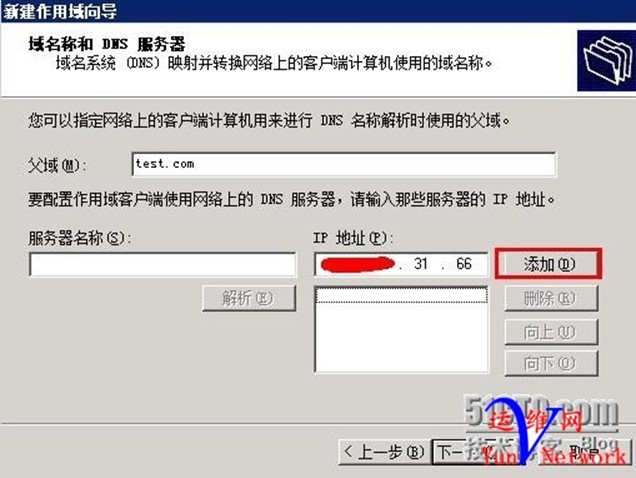
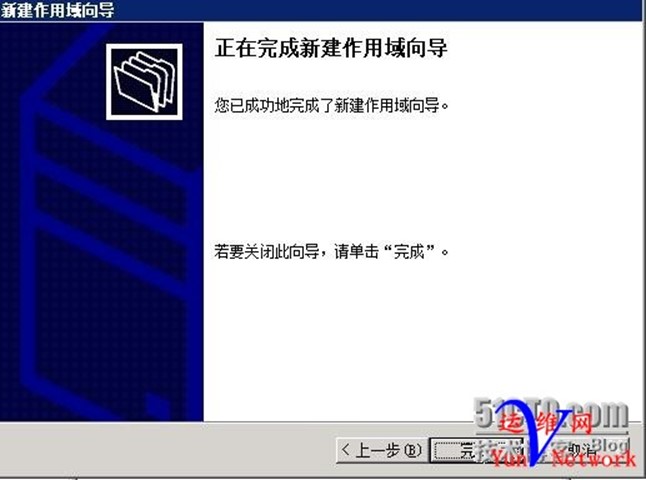
下一步,下一步,完成
按照以上方法,再次创建作用域,供给VLAN 223使用

下一步,下一步,添加网关地址172.16.223.254

添加DNS地址,本机
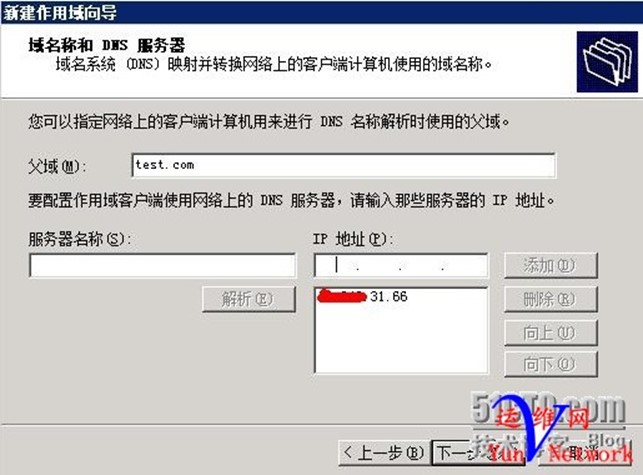
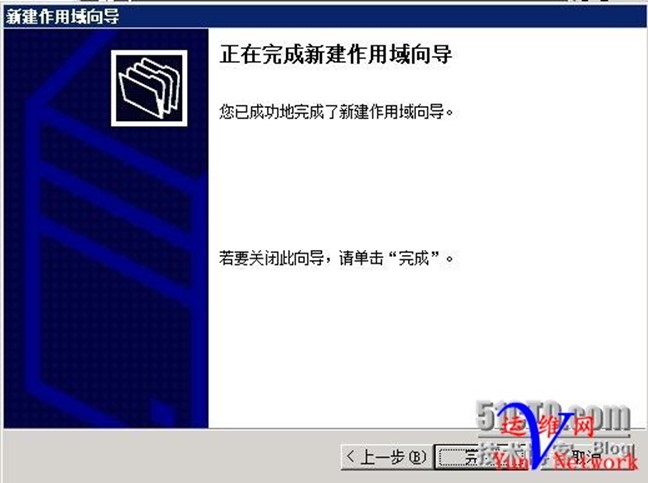
下一步,下一步,完成
七、Cisco交换机配置
根据官方文档及项目资料整理,详细介绍参见(3560/3750交换机配置指导12.2(50)以上版本radius/802.1x配置)
1、交换机启用radius认证:
aaa new-model
//交换机radius及tacacs认证配置都需要启用AAA
aaa authentication dot1x default group radius
aaa authorization network default group radius
aaa accounting dot1x default start-stop group radius
//启用802.1x认证、授权与审计
aaa sever radius dynamic-author
client 10.1.11.161 sever-key mindray
//很重要,全是关键字,10.1.11.161(服务器地址)。
12.2(50)版本后CoA(Change of Authorization)配置开启命令,AAA服务器主动推送CoA包,当授权状态变化时交换机接收动态授权包
dot1x system-auth-control
//(很重要)交换机全局启用dot1x,必须开启,否则MAB认证后不会主动进行802.1x认证
ip device tracking
//很重要,跟踪设备的IP地址,替换download访问控制列表(radius服务器上配置)原IP,没跟踪上,ping等操作都会出现问题
radius-server attribute 6 on-for-login-auth
//属性6,接入请求时发送服务类型参数,在登陆认证时,发第一个request请求,发用户名密码时附上服务类型,AAA服务器根据服务类型决定如有线无线如何操作
radius-server attribute 8 include-in-access-req
//属性8,接入请求时发送IP地址数据帧,与以前不同,可能开始时网已经通了,在进行802.1x认证,radius服务器也可以根据发送的IP地址进行有线无线等的操作
radius-server attribute 25 access-request include
radius-server dead-criteria time 5 tries 3
//判断radius是否有问题标准,尝试3次,每次5秒,通过15秒相应,判断radius是否有问题,并做相应策略
radius-server host 10.1.11.161 auth-port 1812 acct-port 1813
radius-server key mindray
//radius服务器ip,认证审计端口配置,交换机与radius服务器通信关键字
radius-server vsa send accounting(可选)
radius-server vsa send authentication
//很重要,vsa(厂商特殊属性),ISE等radius服务器有些厂商特殊属性需要下发,不开启只会下发标准属性,download访问控制列表可能会无法下发
全局模式 mac move配置:
authentication mac-move permit
//缺省情况当一个mac地址已经在一个交换机端口下认证过,再转移到另一个端口时会被拒绝,启用mac-move,可以使交换机端口快速开启认证,
如IP电话后接PC转接交换机其他端口时快速认证(12.2(50)以后版本默认开启,12.2(50)以前版本无此配置),authentication open模式下,一个mac地址可以立即从原始端口move到新端口,并且不需要在新端口请求授权两个重要的基本访问控制列表配置:
PS:如果交换机启用语音VLAN默认接Cisco话机使用的是CDP协议,如果第三方话机如Yealink需要开启LLDP协议,语音VLAN才会生效。
Switch(config)#lldp run
(1)简单列表配置(可选):(交换机802.1X认证通过前放行部分基本流量)
ip access-list extended ACL-DEFAULT
remark dhcp
permit udp any eq bootpc any eq bootps
remark dns
permit udp any any eq domain
remark ping
permit icmp any any
remark tftp
permit udp any any eq tftp
remark drop all the rest
deny ip any any log
(2)Web重定向列表配置(可选):(用于web认证配置时决定什么样的流量做重定向)
ip access-list extended WEB-REDIRECT
deny udp any any eq domain
deny udp any host 10.1.11.161 eq 8905
deny udp any host 10.3.220.254 eq 8905(接交换机设备网关,web认证时客户端会首先发包到网关,交换机做后续处理)
deny udp any host 10.1.11.161 eq 8906
deny udp any host 10.1.11.161 eq 8909
deny tcp any host 10.1.11.161 eq 8443
deny tcp any host 10.1.11.161 eq 8905
deny tcp any host 10.1.11.161 eq 8909
deny tcp any host 10.3.220.254 eq 8905(接交换机设备网关)
permit ip any any
2、端口0/x启用MAB和802.1x认证:
MAB: mac address bypass,mac地址旁路,用于不能做802.1x认证如打印机,AP,Avaya IP电话等设备做认证
inteface g0/x
description To XXX
switchport mode access
switchport access vlan 220
//(可选)数据vlan,当802.1x用户名密码认证根据用户名密码决定vlan下发时可不用配置
switchport voice vlan 221
//接IP电话等语音设备时必须配置,mutil-auth端口下只能有一个voice valn

可选配置:
ip access-group ACL-DEFAULT in
//调用简单列表(见上文),与authentication open模式配合使用可降低认证风险
authentication event fail action next-method
//认证失败时采用下一中认证方式,如mab失败后采用802.1x
authentication event sever dead action authorize vlan XXX
//服务器down掉时接入指定的valn
authentication event sever alive action reinitiaize
//服务器alive时,重新开始认证
authentication event no-response action authorize vlan YYY
//认证没有响应时接入指定vlan(guest vlan,mutil-auth端口下不可以配置guest vlan和auth-fail valn)
authentication host-mode multi-auth
//四种主机模式,mutil-auth功能最为强大,详情请参考官方交换机文档
authentication open
//低风险模式(需要配置简单的列表(见上文)并调用)
authentication order mab dot1x
//先做mac地址旁路,再做802.1x(更改顺序如dot1x mab无意义)
authentication priority dot1x mab
//当两个认证都通过并获得授权,dot1x授权起效(更改顺序如mab dot1x无意义)
authentication port-control auto
//启用802.1x
authentication violation restrict
//交换机端口安全配置,违反限制,会发送警报信息(默认开启)
mab
//启用mab
dot1x pae authenticator
//(12.2(50)以前版本默认交换机是认证者,12.2(50)以后可以是客户端也可以是认证者)
spanning-tree portfast

3、查看接口认证结果:
(1)show authentication session interface g0/x
//查看接口mab/dot1x认证、授权状态信息
如:
Test-3560(config-if)#do show auth sess int f0/48
Interface: FastEthernet0/48
MAC Address: 001b.4f50.9392
IP Address: 10.5.222.70
User-Name: 00-1B-4F-50-93-92
Status: Authz Success
Domain: VOICE
Oper host mode: multi-auth
Oper control dir: both
Authorized By: Authentication Server
Session timeout: 120s (local), Remaining: 52s
Timeout action: Reauthenticate
Idle timeout: N/A
Common Session ID: 0A03DCF0000000010044F8BD
Acct Session ID: 0x00000004
Handle: 0xCF000001
Runnable methods list:
Method State
mab Authc Success
dot1x Not run

(2)show ip access-lists interface g0/x
//查看接口访问控制列表下发情况,认证成功,会主动替换源IP,如permit any any变为permit x.x.x.x any
如:
Test-3560#show ip access-lists int f0/48
permit ip host 10.5.222.70 any
(3)show ip device tracking intface g0/x
//查看接口ip地址跟踪信息,可以看到valn下发状况
如:
Test-3560#show ip device tracking int f0/48
IP Device Tracking = Enabled
IP Device Tracking Probe Count = 3
IP Device Tracking Probe Interval = 30
---------------------------------------------------------------------
IP Address MAC Address Vlan Interface STATE
-------------------------------------------------------------------
10.5.222.70 001b.4f50.9392 222 FastEthernet0/48 ACTIVE
Total number interfaces enabled: 1
Enabled interfaces:
Fa0/48

4、其他可选配置
no authentication logging verbose
no dot1x logging verbose
no mab logging verbose
//过滤冗余认证log信息

5、示例
(1)完整的交换机radius配置示例:
Test-3560#show run | in radius
aaa authentication dot1x default group radius
aaa authorization exec default group radius
aaa authorization network default group radius
aaa accounting dot1x default start-stop group radius
aaa server radius dynamic-author
radius-server attribute 6 on-for-login-auth
radius-server attribute 8 include-in-access-req
radius-server attribute 25 access-request include
radius-server dead-criteria time 5 tries 3
radius-server host 10.1.11.161 auth-port 1812 acct-port 1813
radius-server key mindray
radius-server vsa send accounting
radius-server vsa send authentication

(2)完整的交换机接口配置示例:
Test-3560(config-if)#do show run int f0/48
Building configuration...
Current configuration : 789 bytes
!
interface FastEthernet0/48
description To Avaya IP Phone
switchport access vlan 220
switchport mode access
switchport voice vlan 222
ip access-group ACL-DEFAULT in
authentication event fail action next-method
authentication event server dead action authorize vlan 221
authentication event server alive action reinitialize
authentication host-mode multi-auth
authentication open
authentication order mab dot1x
authentication priority dot1x mab
authentication port-control auto
authentication periodic
authentication timer restart 60
authentication timer reauthenticate 120
authentication violation restrict
mab
dot1x pae authenticator
storm-control broadcast level 20.00
storm-control multicast level 20.00
storm-control action shutdown
spanning-tree portfast

End
八、交换机配置汇总
1、全局配置
aaa new-model
aaa authentication dot1x default group radius
aaa authorization network default group radius
aaa accounting dot1x default start-stop group radius
aaa server radius dynamic-author
client 10.16.98.68 server-key cisco
client 10.16.98.69 server-key cisco
radius-server attribute 6 on-for-login-auth
radius-server attribute 8 include-in-access-req
radius-server attribute 25 access-request include
radius-server dead-criteria time 5 tries 3
radius-server host 10.16.98.69 auth-port 1812 acct-port 1813 key cisco
radius-server vsa send accounting
radius-server vsa send authentication
dot1x system-auth-control

2、接口配置

interface FastEthernet0/2
switchport access vlan 810
switchport mode access
switchport voice vlan 860
authentication event fail action next-method
authentication event server alive action reinitialize
authentication host-mode multi-auth
authentication order mab dot1x
authentication priority mab dot1x
authentication port-control auto
authentication violation restrict
mab
dot1x pae authenticator
spanning-tree portfast
九、EAP-TLS
RADIUS: Creating a Policy in NPS to support EAP-TLS authentication
When using WPA2-Enterprise with 802.1x authentication EAP-TLS can be specified as an authentication method. When EAP-TLS is the chosen authentication method both the wireless client and the RADIUS server use certificates to verify their identities to each other and perform mutual authentication. Below are the steps for configuring policy in Windows Network Policy Server to support EAP-TLS.
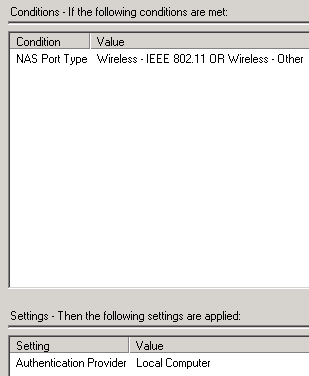
Creating a Connection Request Policy to support IEEE 802.11 wireless connections.
- Open the Network Policy Server console.
- Navigate to NPS(Local)>Policies>Connection Request Policies.
- Right click Connection Request Policies and select New.
- On Specify Connection Policy Name and Connection Type enter a Policy name: and click Next.
- On Specify Conditions click Add.
- Select NAS Port Type as a condition.
- For NAS Port Type check Wireless – IEEE 802.11 and Wireless – Other click OK.
- Click Next.
- On Specify Connection Request Forwarding leave the defaults and click Next.
- On Specify Authentication Methods leave the defaults and click Next.
- On Configure Settings click Next.
- Review the settings On Completing Connection Request Policy Wizard and click Finish.
- Right click the Connection Policy created and select Move up so its processing order is before any other policies.
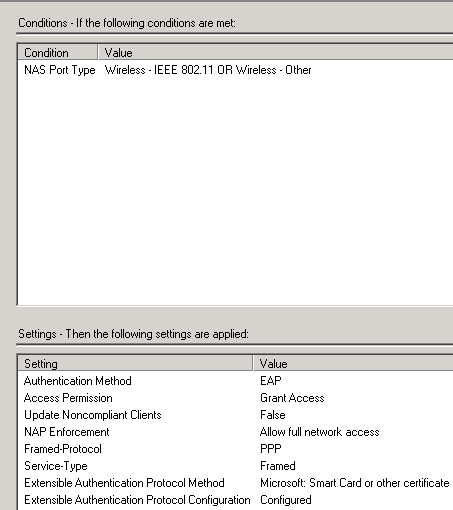
Creating a Network Policy to support EAP-TLS as the authentication method for IEEE 802.11 wireless connections.
- Right click Network Policies and select New.
- On Specify Network Policy Name and Connection Type enter a Policy name: and click Next.
- On Specify Conditions click Add.
- Select NAS Port Type as a condition.
- For NAS Port Type check Wireless – IEEE 802.11 and Wireless – Other click OK.
- Click Next.
- On Specify Access Permissions make sure Access granted is selected and click Next.
- On Configure Authentication Methods click Add and choose Microsoft: Smart Card or other certificate for Add EAP and click OK.
- Uncheck any boxes under Less secure authentication methods.
- Select Microsoft: Smart Card or other certificate for EAP types and click Edit.
- Verify the Certificate issued to: drop down shows the correct certificate and issuer which is the Active Directory CA server. Then click OK.
- Click Next.
- On Configure Constraints click Next.
- On Configure Settings choose NAP Enforcement.
- Under Auto-Remediation, uncheck the box Auto-remediation of client computers and click Next.
- Review the settings on Completing New Network Policy and Click Finish.
- Right click the Network Policy created and select Move up so its processing order is before any other policies.
十、NPS 日志分析工具
官网
http://www.deepsoftware.com/npslog/download.html
十一、How to authenticate multiple WIFI SSIDs on a single NPS server (RADIUS)
Introduction
Recently I worked with customer on interesting scenarios where they needed they were unable to make necessary restriction when using multiple WIFI Networks. They created WIFI Network devices such as Computer, Tablets and Mobile Phones. That was necessary because which network provided a different level of access. The goal was to ensure all WIFI networks (SSIDs) can be handled by a single NPS Server and users cannot use their credentials to access other WIFI SSID if they are not authorized. However, after creating a few Network Policy Rules, the first side effect was when a user accessed SSID, for example for SSID dedicated to mobiles, user was getting authenticated in another rule dedicated SSID for computers.
Scenario
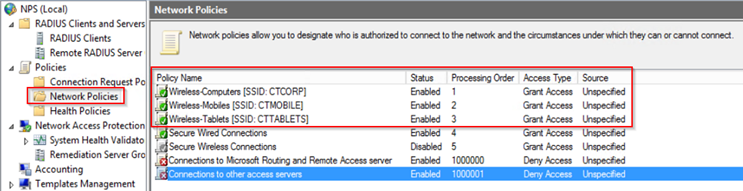
For this scenario, the following Network Policy Rules and respective specific Groups show below:
- Rule 1: Wireless-Computers [SSID: CTCORP]
– NAS Port Type = Wireless – Other OR Wireless – IEE 802.11
– Windows Groups = CONTOSO\WIFI-Corp-Users - Rule 2: Wireless-Mobiles [SSID: CTMOBILE]
– NAS Port Type = Wireless – Other OR Wireless – IEE 802.11
– Windows Groups = CONTOSO\WIFI-Mobiles - Rule 3: Wireless-Tablets [SSID: CTTABLETS]
– NAS Port Type = Wireless – Other OR Wireless – IEE 802.11
– Windows Groups = CONTOSO\WIFI-Tablets
Here is a view of the same rules above inside the NPS interface:
The diagram below shows how the policies should work. One of the requirements is to ensure when I user does not belong to a group, she or he should not be authorized to use the respective SSID. In this case, we can do more granular control of which type of devices can access the network with different restrictions. For example, for tables accessing CTTABLETS will have only access to Internet but no access internal resources, while for computers accessing WIFI SSID CTCORP they should have full access to the network and Internet.
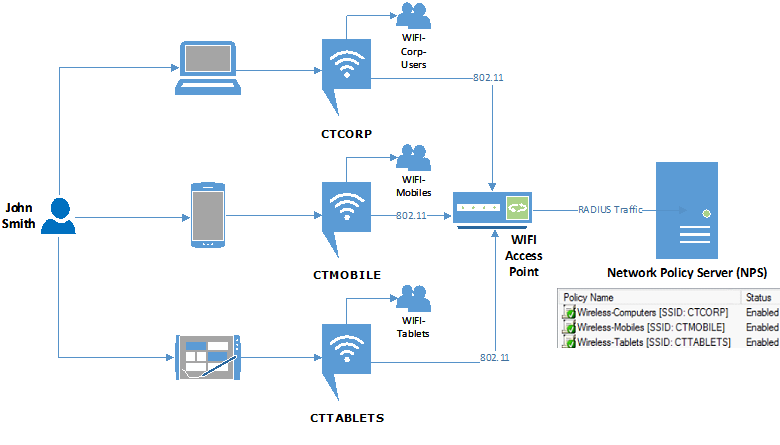
The real problem starts when user belongs to two or more groups. For example, user John Smith is authorized to access WIFI from all types of devices, which means he belongs to all groups listed above. However, when using his computer, we need to make sure he authenticates on WIFI SSID CTCORP, when using his Smartphone, he needs to access WIFI SSID CTMOBILE and when he uses his Tablet he needs to use WIFI SSD CTTABLETS.
In case we John Smith is removed from group CONTOSO\WIFI-Mobiles he will still have access to the SSID CTMOBILE. Why? If you see the list of rules Rule: Wireless-Computers [SSID: CTCORP] has process order 1. Which means he will be authenticated by that Rule.
Resolution
The Solution for this scenario is to add a Condition inside the Network Policy and specify the Called Station ID which presents the WIFI Access Point MAC Address plus SSID.
This information can be easily extracted from NPS Event logs (Event Viewer – Custom Views – Server Roles – Network Policy and Access Services). When user is using a specify SSID that information is specified on Called Station ID populated as highlighted below.
Source: Microsoft-Windows-Security-Auditing
Event ID: 6278
Task Category: Network Policy Server
Level: Information
Keywords: Audit Success
Description: Network Policy Server granted full access to a user because the host met the defined health policy.
Security ID: CONTOSO\JohnSmith
Account Name: CONTOSO\JohnSmith
Account Domain: Domain
Fully Qualified Account Name: CONTOSO\JohnSmith
Called Station Identifier: 00-1C-C5-01-52-00: CTMOBILE
Calling Station Identifier: 25-E6-8C-24-E3-11
NAS: NAS IPv4 Address: 10.1.1.210
NAS IPv6 Address: –
NAS Identifier: 3Com NAS
Port-Type: Wireless – IEEE 802.11
RADIUS Client: Client Friendly Name: WIFIAccessPoint
Client IP Address: 10.1.1.210
Authentication Details: Connection Request Policy
Name: Secure Wireless Connections Network Policy
Name: 802.1X-Wireless-MOBILES [CORPv3]
Authentication Provider: Windows
Note: While creating the condition in Network Policy do not make confusion between Called Station Identifier with Calling Station Identifier which presents real computer’s MAC address.
In summary, here are the action to do in each one of the Network Policy Rile, where you will specify the respective SSID as shown:
- Rule 1 Wireless-Computers [SSID: CTCORP]
Called Station ID= CTCORP - Rule 2 Wireless-Mobiles [SSID: CTMOBILE]
Called Station ID= CTMOBILE - Rule 3 Wireless-Tablets [SSID: CTTABLETS]
Called Station ID= CTTABLETS
Here is an example on how is done via GUI in five and self-explanatory simple steps :
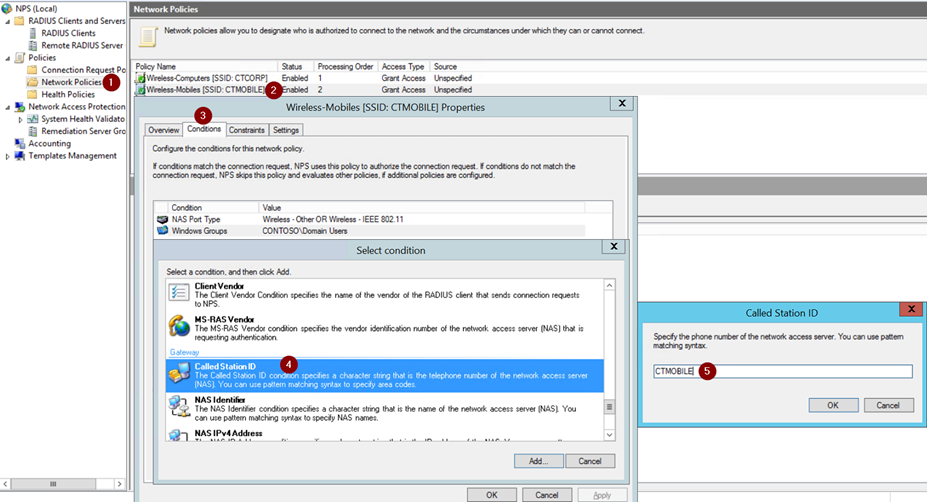
It is important to note that you just need to add the SSID name as is and it will be searched in the field as string in any position. You can play with regular expression also well to adequate with your needs. You can leverage this documentation in TechNet: Using Regular Expressions in NPS
Conclusion
In this article, we demonstrated how to allow a single user who belongs which needs access multiple WIFI Networks (SSID’s) while using a single Network Policy Server (NPS) to perform the authentication correctly on its respective rule matching the SSID by using Called Station ID. I hope this help you to implement this kind of scenario on your network and let us know your thoughts or questions in the comments below.
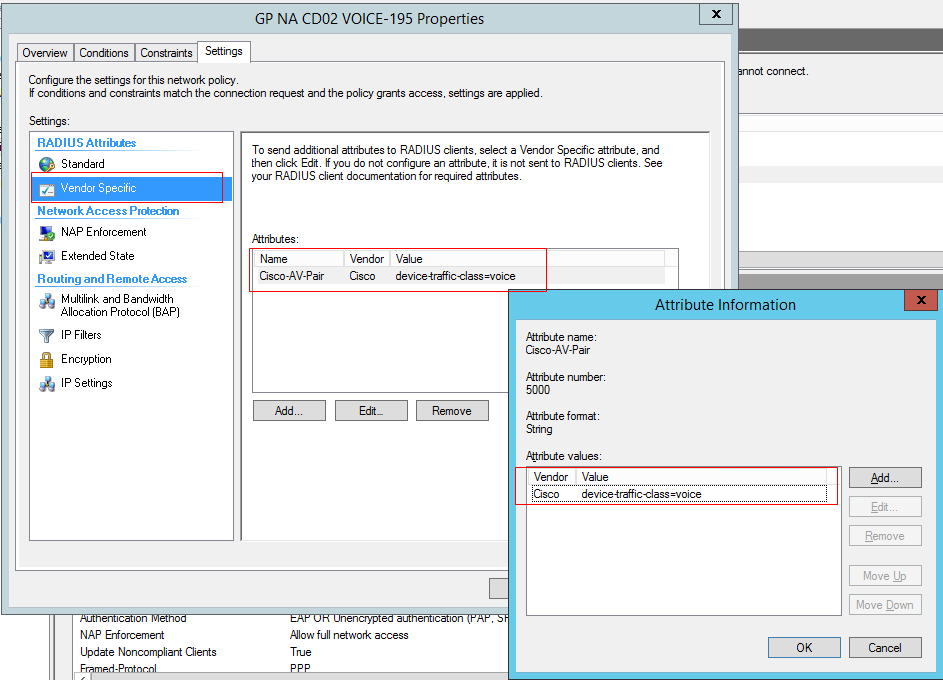
十二、Cisco voice vlan 下发属性
- Edit the duplicated _Phones policy so that it sends the Cisco attribute Cisco-AV-Pair “device-traffic-class=voice”
Do this on the settings tab of the NP, select “Vendor Specific”, and then click “Add…”, and then select “Cisco” from the Vendor: pull down menu, and then select “Cisco-AV-Pair” from the list, and then click “Add…”, and then enter device-traffic-class=voice in the attribute value: box, OK, OK, Close, OK
Enable the NP
十三、ELK.Winlogbeat收集日志
###################### Winlogbeat Configuration Example ##########################

# This file is an example configuration file highlighting only the most common
# options. The winlogbeat.reference.yml file from the same directory contains all the
# supported options with more comments. You can use it as a reference.
#
# You can find the full configuration reference here:
# https://www.elastic.co/guide/en/beats/winlogbeat/index.html

#======================= Winlogbeat specific options ==========================

# event_logs specifies a list of event logs to monitor as well as any
# accompanying options. The YAML data type of event_logs is a list of
# dictionaries.
#
# The supported keys are name (required), tags, fields, fields_under_root,
# forwarded, ignore_older, level, event_id, provider, and include_xml. Please
# visit the documentation for the complete details of each option.
# https://go.es.io/WinlogbeatConfig
winlogbeat.event_logs:
- name: Security
ignore_older: 72h
event_id: 13, 4400, 6272, 6273, 6274, 6278

#==================== Elasticsearch template setting ==========================

setup.template.settings:
index.number_of_shards: 3
#index.codec: best_compression
#_source.enabled: false

setup.template.name: "nps_auth-%{[beat.version]}"
setup.template.pattern: "nps_auth-%{[beat.version]}-*"

#================================ General =====================================

# The name of the shipper that publishes the network data. It can be used to group
# all the transactions sent by a single shipper in the web interface.
#name:

# The tags of the shipper are included in their own field with each
# transaction published.
#tags: ["service-X", "web-tier"]

# Optional fields that you can specify to add additional information to the
# output.
#fields:
# env: staging

#============================== Dashboards =====================================
# These settings control loading the sample dashboards to the Kibana index. Loading
# the dashboards is disabled by default and can be enabled either by setting the
# options here, or by using the `-setup` CLI flag or the `setup` command.
setup.dashboards.enabled: true

# The URL from where to download the dashboards archive. By default this URL
# has a value which is computed based on the Beat name and version. For released
# versions, this URL points to the dashboard archive on the artifacts.elastic.co
# website.
#setup.dashboards.url:

#============================== Kibana =====================================

# Starting with Beats version 6.0.0, the dashboards are loaded via the Kibana API.
# This requires a Kibana endpoint configuration.
setup.kibana:

# Kibana Host
# Scheme and port can be left out and will be set to the default (http and 5601)
# In case you specify and additional path, the scheme is required: http://localhost:5601/path
# IPv6 addresses should always be defined as: https://[2001:db8::1]:5601
host: "sskib01:5601"

# Kibana Space ID
# ID of the Kibana Space into which the dashboards should be loaded. By default,
# the Default Space will be used.
#space.id:
setup.dashboards.index: "nps_auth-*"

#============================= Elastic Cloud ==================================

# These settings simplify using winlogbeat with the Elastic Cloud (https://cloud.elastic.co/).

# The cloud.id setting overwrites the `output.elasticsearch.hosts` and
# `setup.kibana.host` options.
# You can find the `cloud.id` in the Elastic Cloud web UI.
#cloud.id:

# The cloud.auth setting overwrites the `output.elasticsearch.username` and
# `output.elasticsearch.password` settings. The format is `<user>:<pass>`.
#cloud.auth:

#================================ Outputs =====================================

# Configure what output to use when sending the data collected by the beat.

#-------------------------- Elasticsearch output ------------------------------
output.elasticsearch:
# Array of hosts to connect to.
hosts: ["sses01:9200"]
index: "nps_auth-%{[beat.version]}-%{+yyyy.MM.dd}"

# Enabled ilm (beta) to use index lifecycle management instead daily indices.
#ilm.enabled: false

# Optional protocol and basic auth credentials.
#protocol: "https"
#username: "elastic"
#password: "changeme"

#----------------------------- Logstash output --------------------------------
#output.logstash:
# The Logstash hosts
#hosts: ["localhost:5044"]

# Optional SSL. By default is off.
# List of root certificates for HTTPS server verifications
#ssl.certificate_authorities: ["/etc/pki/root/ca.pem"]

# Certificate for SSL client authentication
#ssl.certificate: "/etc/pki/client/cert.pem"

# Client Certificate Key
#ssl.key: "/etc/pki/client/cert.key"

#================================ Processors =====================================

# Configure processors to enhance or manipulate events generated by the beat.

processors:
- add_host_metadata: ~
- add_cloud_metadata: ~

#================================ Logging =====================================

# Sets log level. The default log level is info.
# Available log levels are: error, warning, info, debug
#logging.level: debug

# At debug level, you can selectively enable logging only for some components.
# To enable all selectors use ["*"]. Examples of other selectors are "beat",
# "publish", "service".
#logging.selectors: ["*"]

#============================== Xpack Monitoring ===============================
# winlogbeat can export internal metrics to a central Elasticsearch monitoring
# cluster. This requires xpack monitoring to be enabled in Elasticsearch. The
# reporting is disabled by default.

# Set to true to enable the monitoring reporter.
#xpack.monitoring.enabled: false

# Uncomment to send the metrics to Elasticsearch. Most settings from the
# Elasticsearch output are accepted here as well. Any setting that is not set is
# automatically inherited from the Elasticsearch output configuration, so if you
# have the Elasticsearch output configured, you can simply uncomment the
# following line.
#xpack.monitoring.elasticsearch:
文章目录


评论抢沙发